
This setup process will take you about an hour. It is required to to send or receive messages in the USA. There is a registration fee to verify your business
What is A2P 10DLC in a Nutshell?
A2P (Application to Person) 10DLC (10 digit long code) is the standard that United States telecom carriers have put in place to ensure that SMS traffic to US end-users through long code phone numbers is verified and consensual.
Anyone sending SMS/MMS messages over a 10DLC number from an application to the US must register for A2P 10DLC. Messages sent to the U.S. using unregistered +1 10DLC numbers will be blocked and may be subject to additional carrier fees
If you are not in the US and will not be messaging US numbers you do not need to register your business and can go directly to connecting Twilio to you Moverbase Account.
Steps to Register Your Business
To get started you’ll need to create an account for your business through Twilio’s Trust Portal. There are three general steps to registering your business for A2P 10DLC compliance
- Create a Brand: You provide information about who is sending these messages so that carriers know you are a legitimate sender. Follow these steps to create your account and register your brand.
- Create a Campaign: You provide information about how end-users can opt-in, opt-out, and receive help. As well as a description of the purpose of your messages.
- Add your Numbers: Once you’ve successfully registered your company through Twilio you can add your phone numbers on their portal.
Creating a Brand
To get started you’ll need to create an account for your business through Twilio’s Trust Portal then submit your business to be registered. Follow the steps below or read through Twilio’s complete guide to create your account and register your brand.
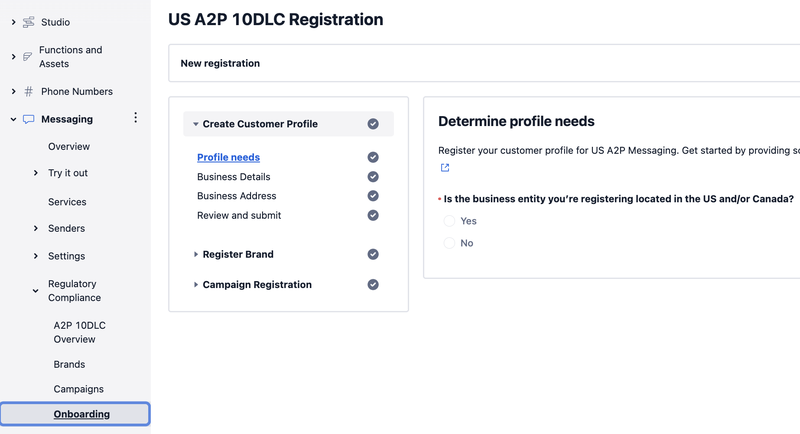
- Create a Twilio Business Profile in Trust Hub : On the Twilio side menu go to Messaging → Regulatory Compliance → Onboarding and answer the prompts to create your Customer Profile
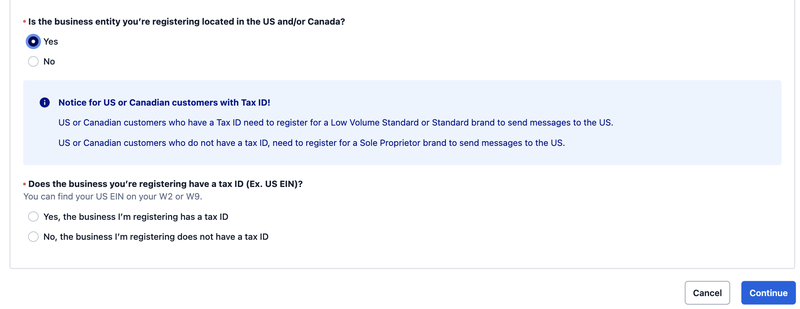
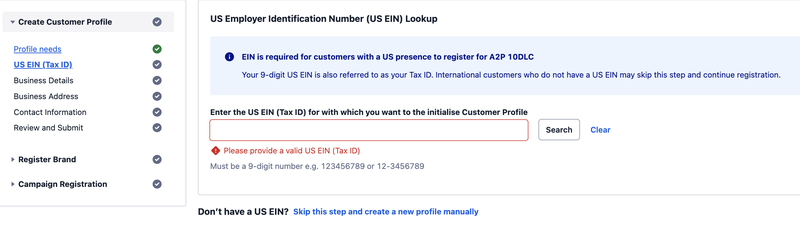
- US and Canadian Customers will need to provide an official Tax ID, i.e. an EIN (for filing business taxes in the US) or Canadian Business Number (for filing in Canada). You can search for this on the next screen.* If you do NOT have a US EIN — use the “Skip this step…” link below the lookup. If you do enter a US EIN in the lookup field, and the associated business entity cannot be found, this is not necessarily cause for concern as a valid EIN could be absent from the database for a variety of reasons (for example, a newly-issued EIN can take a month or longer to register in the database). In this case too you would simply continue manually with Customer Profile setup.
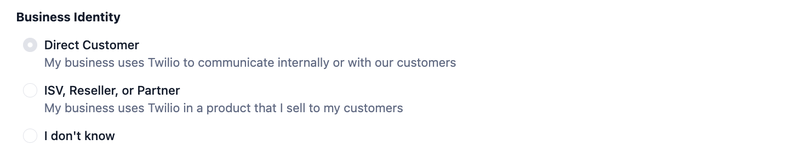
- On the next screens you’ll enter you Business’s Details. Start with you your Business Name (as registered with the EIN) and select Direct Customer for Business Identity. Then continue to fill in the remaining questions with your company’s information. The final screen in this first Business Profile section will summarize all of the information you’ve entered to this point, for your review. If it all looks appropriate, press the blue Submit for Review button at bottom right.* Your Business Profile may take 72 hours or more for approval. You can continue and register a US A2P Brand while your Business Profile is pending approval.

- Once you’ve submitted your business profile for approval the next step is to register as a Low Volume Standard Brand and select your company type (most users will be Private)*A Low-Volume Standard Brand skips secondary vetting. It is less expensive, results in lower throughput and is more suited for customers sending fewer than 6,000 message segments daily. Learn more about Low-Volume Standard vs. Standard brands here.
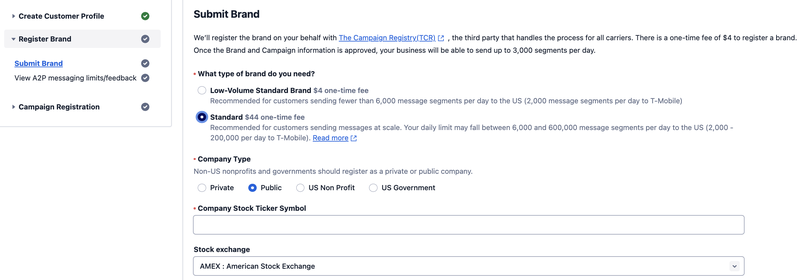
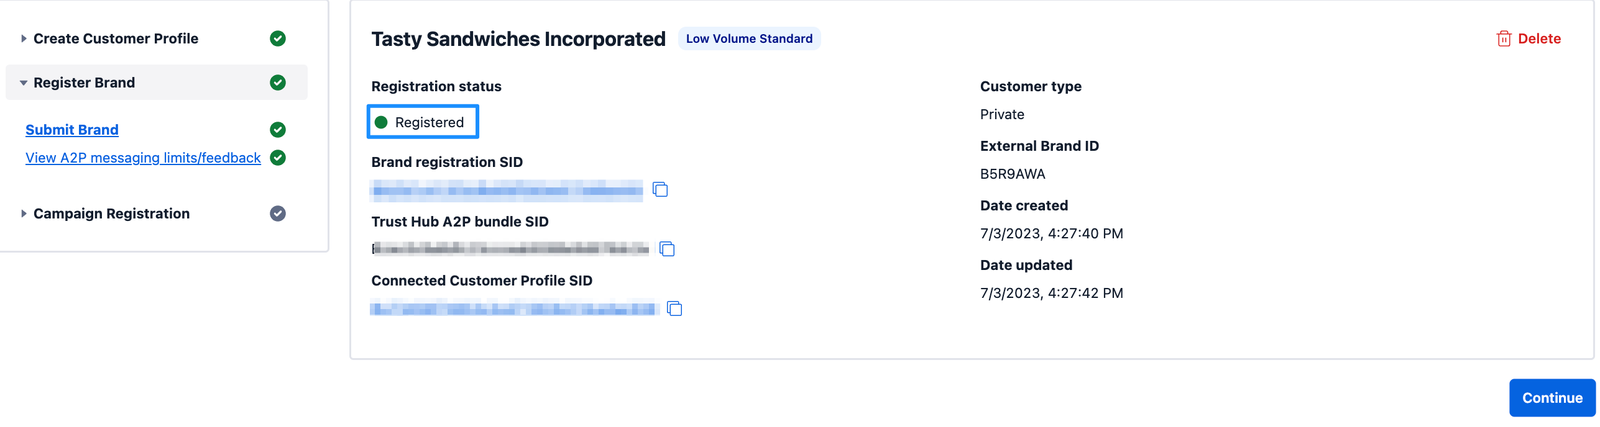
- Submit your Brand! Agree to the one-time Brand registration fee ($4 for US A2P Low Volume Standard Brands) to submit your application for approval. Once you have been approved your Registration status will look like this* If you instead receive a notice that your Brand registration has FAILED, please see the Troubleshooting Guide
Create a Campaign
Your brand must be successfully registered before you can create a campaign. Once your brand has been registered the Continue button will display on the Register Brand section. Pressing Continue will take you directly to the Create New A2P Campaign screen with your A2P Brand automatically filled in.
* there is a one-time $15 vetting fee charged each time you submit a campaign. In addition to a monthly use case fee and standard A2P per message fees.
-
A2P BRAND: Enter Your registered brand name
-
Available A2P Campaign use cases: Low-Volume Mixed
- Messaging Service:
Create New Messaging Service (Upon approval you must add the number to this Messaging service for 10DLC to work)
- You may enter the following Moverbase examples for the Campaign description and Sample Messages. Our suggested answer are just a recommendation based on how the service work
Campaign description: ”This campaign enables moving companies to streamline communication with their customers through real-time text messaging. Moving companies can provide instant updates, coordinate schedules, confirm pickup and delivery times, send quotes and status updates, and offer support during the moving process. By facilitating direct and efficient communication, this service enhances customer experience, improves transparency, and reduces operational delays. It’s designed to keep customers informed and engaged, ensuring smoother and more reliable moving services.
Sample Message #1 “Dear {customer} Thank you for contacting [ REPLACE THIS: PUT YOUR COMPANY NAME HERE AS IT SHOWN IN YOUR BRAND ] regarding your upcoming move. To view your quote: https://accountname.moverbase.com/?mode=cl_viewquote&ek=customerquoteid”
Sample Message #2 ”Hi Joe, Please send us your pick up address for Moving job #E124ER23. Thanks, Bill”
Message Sample #3
Hi Joe, we have arrived at the Pickup Location. Your foreman is Frank. He is waiting for you at the moving truck to begin the job.
Message Sample #4
Hi Joe, we have completed unloading. Your moving job is complete. The total duration for this job was 2 hours and 34 minutes. Please find the final invoice at the following link: https:/ /m.moverbase.com/d/{secretKey}
- Message Contents: Check both the boxes for embedded links AND phone numbers
Check: Messages will include embedded links.
Check: Messages will include phone numbers.

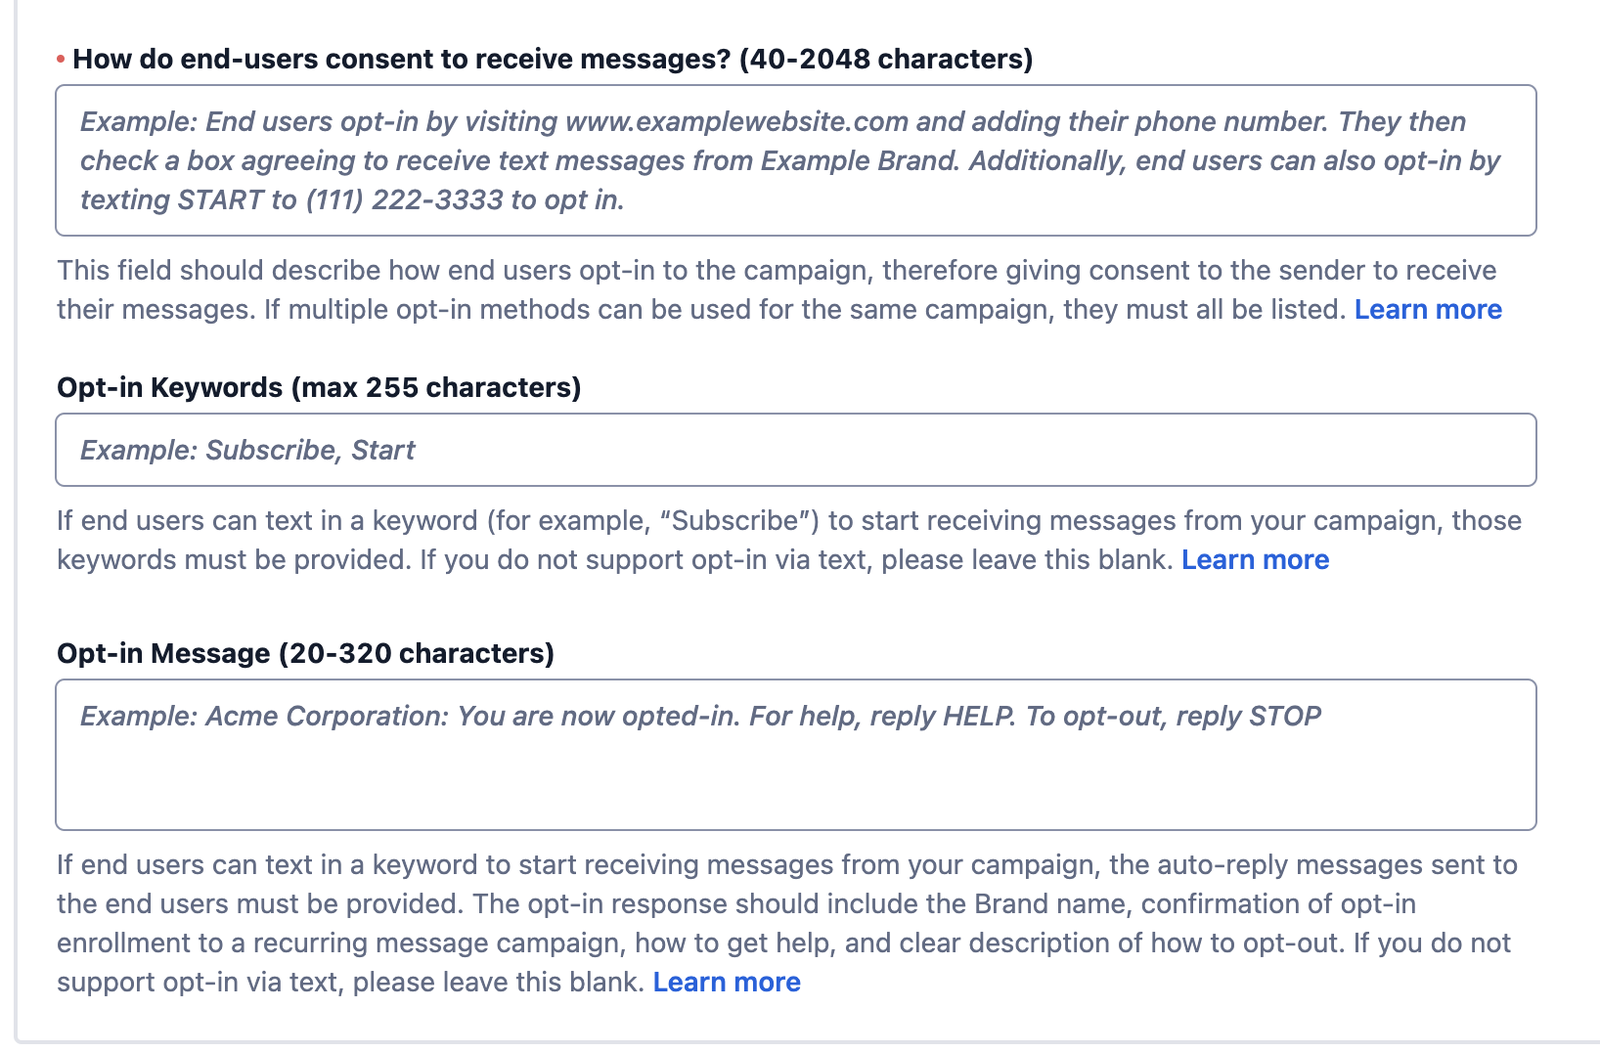
7. For the End User Consent fields enter the following
How do end-users consent to receive messages: ”
End-users must check a box that states: “I agree to receive SMS messages related to my moving job request. Message and data rates may apply. By selecting this option, I hereby agree with the Privacy Policy (REPLACE WITH URL TO THE YOUR WEBSITE PRIVACY POLICY).“
This checkbox may be found in a Request a Quote form that the end-user fills, and also in the client portal where the user accesses their account activity. Both opt-in locations are completely optional.
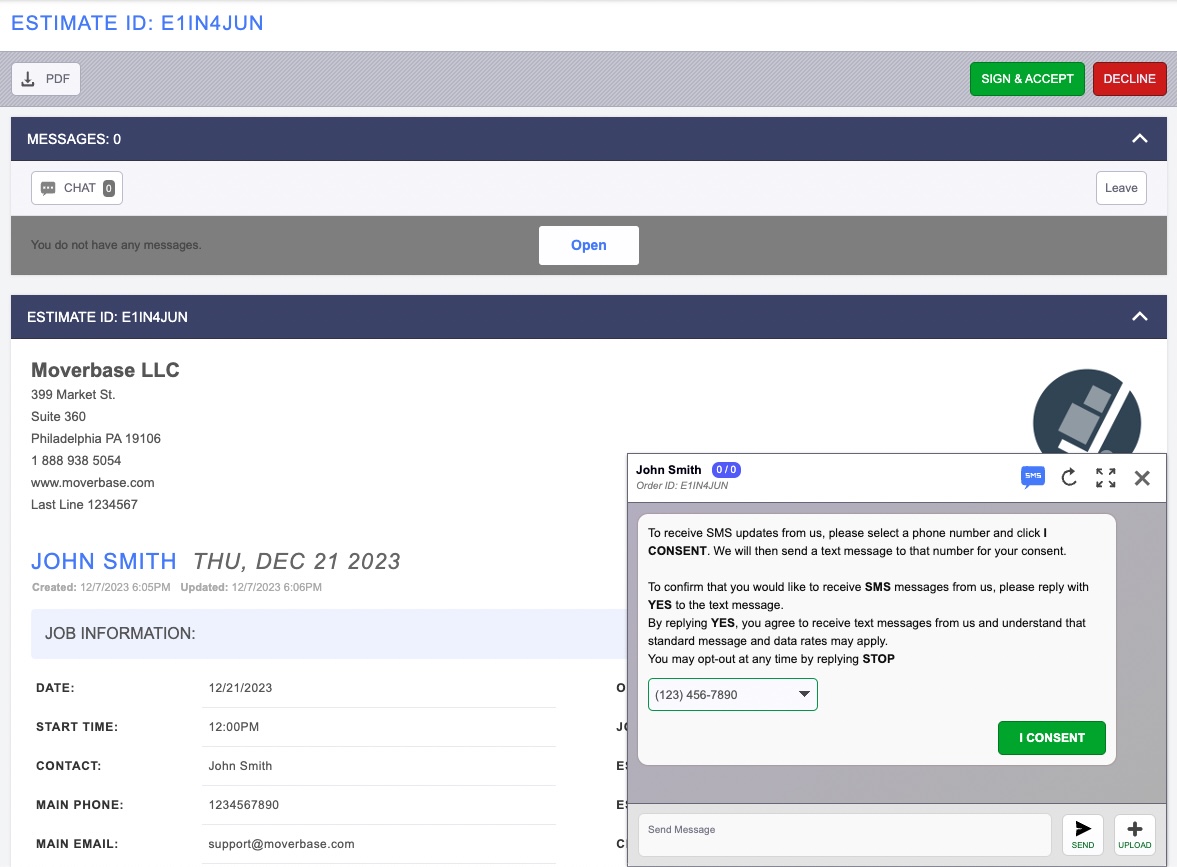
After the end-user selects the box, they will receive instructions to reply YES to opt in, or STOP to opt out at any time.
Here is a link to show you both the Opt-ins for the workflow examples above including opt-in and opt-out interactions on a mobile device:
*** REPLACE WITH URL WITH EXAMPLE LEAD WIDGET IN YOUR WEB SITE
*** This is Example of A web widget URL that we used showing the embed widget showing compliance. It got approved, so we suggest that you create a similar example on your website:
https://www.moverbase.com/widgetsms2024/
___________
Opt-in Keywords: YES
Opt-in Message:
Get job updates from [ REPLACE THIS: PUT YOUR COMPANY NAME HERE AS IT SHOWN IN YOUR BRAND ]. Reply YES to opt-in for SMS (rates may apply). Reply STOP to opt-out.
Opt-out Keyword: STOP
Opt-out Message: You have successfully been unsubscribed. You will not receive any more messages from this number. Reply START to resubscribe
Help Keyword: HELP
Help Message: Reply STOP to unsubscribe. Msg&Data rates may apply
- Attach the following as verification for the online chat
- Click Register Campaign when you are ready to proceed. You will then see a window that asks you confirm the costs associated with Campaign registration and agree to the terms and conditions
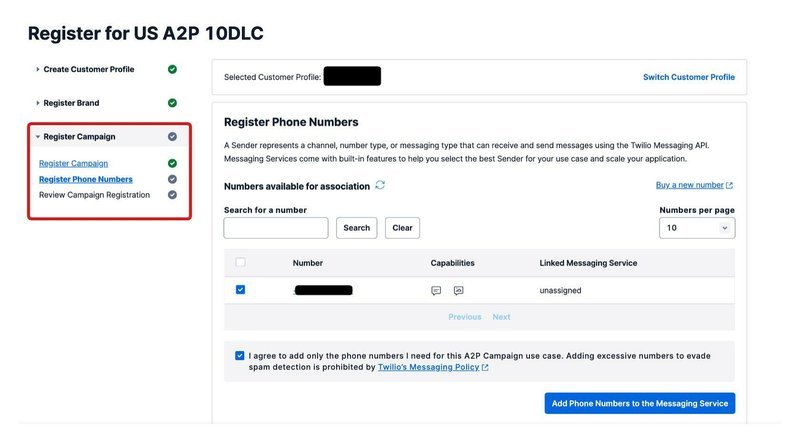
Add Your Numbers
You will need to attach at least one phone number to your newly registered campaign. You will see a list of available phone numbers in your account that you can register. If you do not have any phone numbers, you should purchase one and then refresh the list. Once you’ve selected the phone number(s) to attach and agree to Twilio’s Messaging Policy, click “Add Phone Numbers to the Messaging Service.”
Due to the new manual vetting process, it is normal for your campaign to stay in the “In Progress” state for some days. The Twilio ops team will reach out to you if additional information is needed.
Congratulations!
You have successfully registered for US A2P Messaging capabilities by creating a Business Profile, submitting a US A2P brand, and registering a campaign use case associated with a Twilio Messaging Service! You’re now ready to connect Twilio to Moverbase to start sending SMS messages.
Check out these support articles for more information about how to connect your account and use the new chat and texting features with Moverbase. If you have further questions about Twilio feel free to reach out to support@moverbase.com
How to Connect Moverbase to Twilio to Start Sending SMS Text Messages